Ongoing learning is a double-edged sword. It is awesome to keep learning and those “ah ha” moments are so gratifying. However, you also realize that you were not quite as smart as you thought you were. If only you had known before what you just learned, you would be much better off, right? But going down that rabbit hole will only lead to frustration. What’s actually important is that you keep in the game. Otherwise, ongoing learning and those “ah ha” moments will never happen.
For me that ongoing saga is understanding, using, and programming RPE. Such a simple concept in theory, but only utterly understood if continually used. If you are new to the Team 3DMJ blog and content, let me get you up to speed with a brief background. RPE stands for rating of perceived exertion. The rating is a scale of 1 to 10 and in its original form, can be understood better with the graphic below.

The intent of this blog is to aid in others using RPE, and in turn autoregulation, to its fullest. More importantly though, I hope this info speeds up the time it takes to get familiar with and use RPE effectively. Also, I hope that this information can be used in a training block, not only resulting in good training, but also because simply applying these concepts “hands on” is really how learning happens.
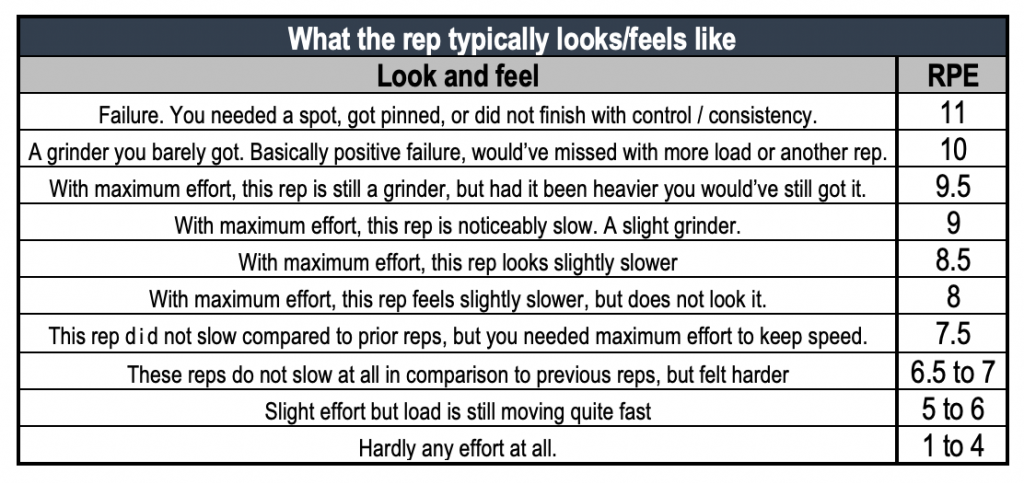
For me and many I have consulted with, it is hard to predict reps in reserve when you have the bar in your hands and are amid a grueling set. Some feel like they almost need a crystal ball. This can lead to both under and over estimating RPE. In my experience, when doing a high rep set, RPE is drastically underestimated. However, when doing heavy low rep sets, RPE is often over estimated. I personally think assessing RPE by reps in reserve is better done once the set is complete, and you have time to reflect on how many more you had in the tank. Consider what the set could have been had you pushed it to concentric failure. I find people learn how to use RPE best when I help them to refine the description and application of RPE to a given set while in “the heat of battle.” Thinking about how reps feel and move mid-set will help you accurately identify a given RPE in a moment’s notice. Some trainees struggle with this so much that they abandon using RPE altogether. To remedy this, I have come up with the following graphic which gives a more descriptive look and feel to all the RPE values you might encounter mid set.

This is not a new or better way of assessing RPE. In fact, this scale is designed to be used alongside the actual RPE scale. It’s intended to give it more context for those who struggle with ratings, so they can get the most out of using RPE and autoregulation. If the goal is to take a lighter load to a specific RPE, in the heat of battle you can assess when to stop your set using the speed of the load you are lifting. Use your smartphone to take video so that after the set you can assess if you had more or less in the tank. Video is super handy when assessing a lighter load set to high RPE, because high rep sets feel hard even when you’re far from failure. On video, it is easy to assess if an RPE of 8 or 8.5 was met because that is usually the rep that visibly slows down. Trust me there is nothing more humbling than finishing a set and saying that you only had 1 or 2 left in the tank only to review the video and none of the reps slowed down. Using video often will keep you honest in your effort. With experience, you’ll learn how often you were actually at lower RPEs than you thought, and once you get more accurate, you’ll learn that taking every set to a real RPE 8 or 8.5 is quite a grueling endeavor.
When taking a high rep set to a high RPE, consistency of form is essential. Try to make every rep a duplicate of the previous or this system of assessment is much less accurate. That is not to say that every rep must be perfectly strict (although it helps); rather, you want to use the same range of motion, degree of body English, you want to avoid long pauses between reps, and as you fatigue you need to try to keep the bar as fast as previous reps. If you use more momentum, cut your depth, take a long rest between reps, or otherwise change the way the rep is performed, you can essentially count that as failure because without that change, you would not have gotten the rep.
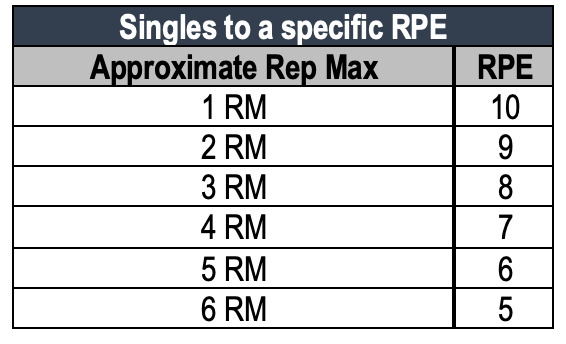
I have found my scale is not just helpful when doing high rep work, but it can also be really helpful for the RPE-challenged when doing heavy singles to a lower RPE. Having foreknowledge of prior training and considering previous moderate rep sets near to failure is especially helpful when choosing your load. For example, say that your program calls for a single at an RPE 7. Using the first table outlining reps in reserve we know that we need to have 3 reps in then tank. Therefore, using a load that is a 4RM would be a good place to start. In a perfect world, after doing 1 rep, you should have 3 reps in reserve. Of course, your 4RM of today isn’t necessarily the same as your 4RM of yesterday, or tomorrow. So, then you can assess how the rep feels as you are doing it based on my chart. Now even though it is “just” a 7 RPE, a 4RM is not light. Thus, the rep usually feels something like this: You un-rack it, and it feels really heavy. You know you need to put maximum effort into this rep. So, you go through your entire check list of bracing, breathing etc., and with maximum force you lift the load. The rep is surprisingly fast, and you know you have more. But it was still heavy. To me, this is a good description of a single at a RPE 7.
Now let’s say for the sake of argument and learning you didn’t rerack it, and kept going, making it into a 4RM (or 4 at a 10 RPE). This is how the rest of the set probably would have felt: You breathe, brace, and start your second rep. Again, maximum effort is used and while the rep did not really look all that slow, it felt it. You breathe, brace, and start your third rep. With maximum effort, this rep slows down noticeably. You breath, brace, and start your fourth and final rep and once again with maximum force, effort, and concentration in your being, you perform an exact duplicate of the previous 3 reps technique wise, but in super slow motion. Other wise known as a real “grinder.” You better have a spotter ready and waiting on this rep in case you misgroove. As you can see, the guidance from my RPE companion chart play out rep by rep.
Many newer trainees do not know the exact load they can get for a 4, 5, 6 or more rep max on any given day. If you do, well this blog may not be needed, as that ability makes choosing your loads that much easier. But typically, this skill is reserved for people whose strength levels are pretty stable, and who are pretty aware of their bodies. However, for those of you who do not know what your 4-6RM loads are, you are probably either relatively new to lifting, or at least new to heavy lifting. For all of you, this chart from the Muscle and Strength Training Pyramids might help you in choosing the initial load as you build experience. With knowledge of your approximate 1RM, you can make a decent guess with what load to select. Using the above-mentioned example of a single at a 7 RPE, this would be a load equaling about 87 to 90% of your 1RM.

Another way to look at it when doing singles, not using a percentage of 1RM, is using the simple chart I created below for selecting loads for singles at specific RPEs.

Implementing RPE to guide training can be really effective, and I hope that those of you who utilize RPE, can use this article to apply it even more effectively. But of primary importance, I know there are many out there who do not use RPE or autoregulation because they are or were intimidated by it, were frustrated when they tried to use it, or didn’t have the patience. If that’s you, that’s ok, trust me you’re not alone. Many of my blogs are not only informational, but stem from actual tools that I use when consulting with clients and answering questions. So, if you’ve struggled with RPE, this blog post is for you, I hope it gets you over the hump and provides an “ah ha” moment or two.
Now, let’s get to work applying these principles in your training. Take a set to a predetermined RPE and film it and see how the speed and feeling aligned. Did the RPE match the bar speed? Try doing several singles at the start of your training sessions while filming and reviewing them to get a better connection between the loads you use, the speed you see, and the feeling of what that specific RPE should be. Next time, take a single at a moderate RPE, say 5-7. Rest, then take that single to a rep max (with a spotter of course) and see if the load you chose was right, and if the RPE rating was accurate. Look at it this way, rating your RPE correctly or not isn’t a pass or fail grade. It’s a skill to develop, so consider any workout where you use it a good workout, as each is an opportunity to build that skill.

That was very helpful, thank you so much. I have just started using rpe and I have been working of the rts chart, I have been taking a single @8 and base my back of sets on that single all @7,8.i seem to be recovering really well from this. Thanks for the blog I really enjoyed reading it.
Awesome. Music to my ears!!!!